For anyone looking to make a new product or improve an existing one, rapid prototyping is an invaluable tool. This article will guide you through how you can incorporate 3D printing into your rapid prototyping process while also reducing your costs and time to market.
What is rapid prototyping?
Rapid prototyping is the process of quickly making a non-final version of a product to test design ideas and get data that will help improve future iterations.
The term is closely tied to additive manufacturing (3D printing) technology as it was originally used to describe the process of making a 3D model using computer aided design (CAD) data which would then be used to 3D print an object, or part on an object, for testing purposes.
When designing a physical product, rapid prototyping allows you to try out different materials, sizes, shapes, colors, and more, to test how they affect form, fit, and function. You can then use the learnings from these experiments to improve the final product.
In more recent times, the term and the principles of rapid prototyping have also been applied to many other disciplines including software and UX design. The concept of a minimum viable product (MVP) shares many similarities with rapid prototyping and the terms are sometimes conflated. The biggest difference is that MVPs are generally released publicly to be used by customers so that a large amount of data can be gathered quickly. Most prototypes are instead used for internal testing or with a limited, controlled, group of potential customers.
Why 3D print your rapid prototypes?
As previously mentioned, 3D printing technology originally inspired the creation of rapid prototyping as a concept. While other manufacturing techniques such as injection molding and CNC machining can be used for rapid prototyping, 3D printing remains one of the most suited.
The goal of any rapid prototyping exercise is to make a quick version of a product that can be used to perform experiments and test assumptions.
That means you need to be able to make custom one-off designs and then modify those designs in successive iterations. You need to be able to produce those iterations as quickly as possible, and the more freedom you have in designing your prototypes, the better. And of course, to justify your experiments financially, all the above requirements need come at an affordable price. Let’s take a look at how well 3D printing matches those criteria:
Speed
When it comes to on-off or small-batch manufacturing, 3D printing is king. Lead times stay low because new custom molds don’t need to be made and you don’t need to wait for your order to be shipped. For medium-to-small objects, it’s possible to create a new 3D design during the day, let it print overnight, and retrieve your completed object from the printer the next morning.
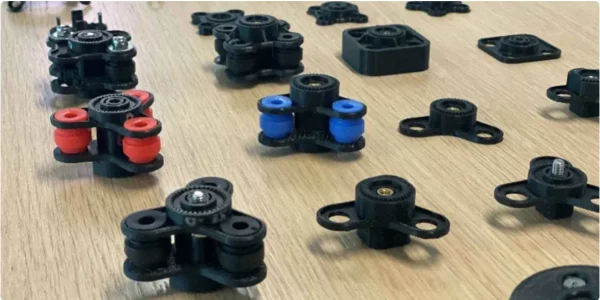
The speed of 3D printing allowed the Melbourne-based company Quad Lock to create over 100 iterations of their vibration-dampening smartphone mount for use on motorcycles. Creating new prototypes was so fast, they were sometimes able to create multiple iterations in a single day.

Some of the many prototypes 3D printed by Quad Lock
Flexibility
The ability to make changes and iterate on a custom design is another area where 3D printing excels. To 3D print an object, you first need to create a digital 3D model of it. 3D models can be changed, replicated, and shared in any way you wish. If a series of experiments is unsuccessful; you can simply load up a previous version and try something else.
3D printing also gives you a lot of flexibility when it comes to the physical properties of your prototypes. Just some of the properties that can be varied depending on the material used are mechanical strength, rigidity, temperature resistance, chemical resistance, dimensional accuracy, and color.
Cost
Costs vary greatly depending on part requirements and what material is used. But creating a part with similar properties using traditional forms of manufacturing such as injection molding, will almost always be more expensive on a per-part basis for small batch or one-off prototypes.
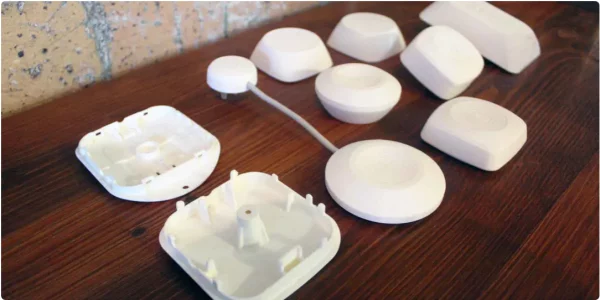
A great example of this playing out in the market is NoiseAware. NoiseAware created a noise-level monitoring device and decided to use an FFF 3D printer for their prototyping process. They were able to reduce their prototyping costs from $800 per product to just $15. This allowed them to both cut costs and create more prototypes, preventing them from going to market with an untested product.

3D printed NoiseAware prototypes
Rapid prototyping applications with 3D printing
Now we know why 3D printing is so well suited to rapid prototyping, lets look at the kind of prototypes that you can make with 3D printing. The following are some categories of prototypes that 3D printing is suitable for:
Proof-of-Concept prototype (POC)
Proof-of-concept prototypes (also known as concept models) are the earliest stage of prototyping. The goal is to test the most basic assumptions about a product with as minimal a risk as possible. These prototypes often have zero consideration of the aesthetics or usability of the product. For this reason, POC prototypes often don’t require the level of fidelity that a 3D printer provides but can still benefit greatly from the speed and low-cost that 3D printing offers.
Visual prototype
Sometimes called appearance prototypes, visual prototypes are meant to demonstrate and validate how a product will look. Including its shape, size, color, and texture. The functionality of the product is of secondary concern when creating this type of prototype. Visual prototypes can help designers make decisions about things like which final materials to use and how a product can be marketed.
3D printing can be perfect for creating visual prototypes as any combination of visual factors can be tested. FFF printers may require some post-processing to perfectly match the finish of the final product but other technologies like SLA printing can get extremely close to approximating the look of a production-ready product straight out of the printer.
Functional prototype
Functional prototypes (also called working prototypes) are meant to demonstrate and validate the functions of a product. The visual appearance is of secondary concern when creating this type of prototype. Often, parallel prototypes will be made to test the separate functions of a single product in isolation before combining them into a more comprehensive prototype. These prototypes can help designers decide which features are essential and which are impractical.
Working prototypes are where 3D printing is most suited as they are where the wide selection of available materials and material properties can be most effectively used.
Engineering/pre-production prototype
Engineering or pre-production prototypes are the final category of prototypes where the findings from all previous prototypes are married together in near-finished product. These prototypes are commonly used to demonstrate the product to potential investors, customers, resellers, and manufacturers.
3D printing can be used to act as, or very closely approximate, end-use parts. But, they may not always be the most suited tool for doing so. This is normally the time when decisions are made about what other manufacturing techniques will be used for the final product and which, if any, will remain 3D printed.
How to include 3D printers in your prototyping process
Once you choose to leverage 3D printing for your prototyping needs, it’s important to assess which solution best fits those needs. There are generally two established ways to adopt 3D printing:
3D printing services
There are many 3D printing services available that will either design a 3D model to your specifications, or use a model you have already created and then print that model on their own printers and send you the resulting print.
3D printing services make the most sense when your rapid prototyping needs are small and the number of iterations low. Or, when you need to leverage a 3D printing technology that is too expensive to fit within your budget. The advantage of using a 3D printing service is that you can still benefit from the quick turn-around and relatively low cost per part that 3D printing can provide without the need to buy your own printers or learn how they work. The downside is that the turnaround on each part not only needs to be printed, but also shipped to you. The cost per part will also be more expensive than printing it yourself and you will have less control over exactly how that part is printed.
Get your own printer

Buying your own printer or printers allows you the freedom to experiment and iterate your prototypes as much as you want in exchange for a higher up-front cost. Buying a printer makes the most sense for companies with ongoing prototyping needs. Setting up your own printer comes with the added requirement that someone on your team learns how to operate it. Luckily, that is easier than ever and there are many educational resources available. Ultimaker offers professionally crafted training courses as part of the Ultimaker Academy. A great resource for getting started with FFF printers.
Which 3D printing technology to use?
When investing in 3D printing, it’s important to buy the printer that most closely matches your needs. There are 5 types of distinctly different technologies that power the majority of the 3D printers currently on the market. Each has its own pros and cons. They are:
| Printer technology | Pros | Cons |
|---|---|---|
| Fused filament fabrication (FFF) | • Simple to operate and maintain • Large material selection • Low material cost • Low printer cost • Minimal post-processing required • Can print with multiple materials at once • Compact printers |
• Visible layer lines • Complicated support structures sometimes required • Slower print speeds |
| Stereolithography (SLA) | • Simple to operate and maintain • Various material properties possible • High level of visual detail and accuracy • Faster print speeds in some cases • Compact printers |
• UV resin is unsafe to handle without PPE • Complicated support structures almost always required • Post-processing required (support removal, cleaning, curing) • Finished parts are sensitive to UV light • Cannot print with multiple materials at the same time |
| Selective laser sintering (SLS) | • No support structures needed • Strong and functional parts |
• Limited material options • Cannot print with multiple materials at the same time |
| Polyjet/Multijet | • High level of visual detail and accuracy • Can print with multiple materials at once • Extremely fast print speeds |
• Post-processing required (support removal, cleaning, curing) • Finished parts are sensitive to UV light • High printer cost |
| Direct metal laser sintering (DMLS) | • Extremely strong and functional parts | • High printer cost • High material cost • Small build volume • Support structures required • Complex post-processing required |
