
Sub-Total: ₱0.00
1. INTRODUCTION
In this guide, we walk you through everything you need to know to go from unboxing your new 3D printer to running an efficient, round-the-clock in-house production operation.
In manufacturing, time is money. With a 3D printer, jigs, fixtures, and other tooling can be produced to almost instantly meet any demand on the factory floor. This means quicker machine setups, less variation during assembly and fitting, secure part holding, and a smoother production process.
What you will learn
The aim of this guide is to help you get started with 3D printing and achieving these benefits as fast as possible. Focusing on Ultimaker fused filament fabrication (FFF) printers, we will look at:
- How to set up your printer and optimize your workspace
- How to put in place a 3D printing workflow that drives business success
- How to make the most of 3D printing with application ideas
This guide has been created with input from Ultimaker experts. It features examples from real-life manufacturers, so you can learn from others in the industry already using 3D printing to reduce production time and costs.
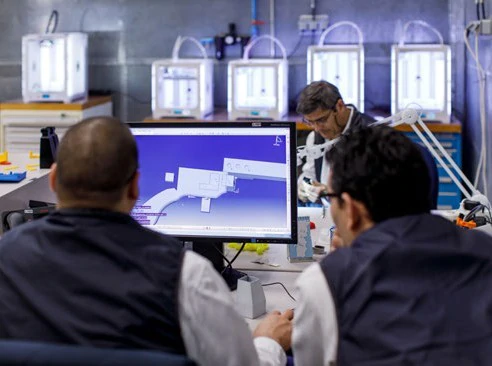
2. SETUP
To get started using your 3D printer as quickly as possible, it is important to consider a few things in advance. How do you install it? Where will you locate the printer?
Who will be using it?
With a desktop 3D printer like Ultimaker, it is easier to change your setup later on compared with if you buy a larger unit. However, you will save time and potentially achieve a complete return on investment faster with the following steps.
Unboxing
Before your new Ultimaker 3D printer arrives, visit our resources web pages and look at the unboxing guide for your chosen printer. We also have videos to help you understand the features and components of your printer and guide you through setup (for example, features explained and unboxing videos for the Ultimaker S5).
Location
As well as unboxing, it is important to analyze your work environment and plan where to locate and how will you operate the printers.
Desktop 3D printers are considered clean and safe for an office or manufacturing environment, and are quiet enough to be placed on a typical workstation. However, if one 3D printer is serving multiple people, or you have a multiple 3D printer setup, the best option may be to create a central area for 3D printing which gives easy access to anyone who needs it.
Alternatively, it could be better to install the 3D printer or printers near to other key equipment in the workspace.
While noise is generally not a problem for single 3D printer installations, if multiple 3D printers are installed, it can be preferable that they are together in a separate area to reduce the effect of the overall noise. No Ultimaker 3D printer exceeds a maximum noise level of 50 dB.
Another practical consideration is ventilation – but this is really only an issue for specific materials (such as ABS), where the fumes produced can be unpleasant without suitable mitigating measures. Ultimaker provides guidance in printer manuals and the safety data sheet for every Ultimaker material.
Operation
Ultimaker 3D printers are designed to ensure reliability and maximum uptime, for round-the-clock production.
Ultimaker 2+, Ultimaker 3, and Ultimaker S5 printers are all certified for safe unattended use, so you can leave your printers to run overnight and at the weekend for maximum efficiency. We will cover printer operation and management in more detail in the next chapter.
To send a file to print there are two main methods: manual file transfer (via an SD card on the Ultimaker 2+, or USB on Ultimaker 3 or Ultimaker S5), or printing over network (Ultimaker 3 or Ultimaker S5).
There are many advantages to printing over network, as it frees designers and operators from having to continually walk over to the 3D printer they need to start a print. This is particularly helpful if you work in a large facility. You can connect to a network either over Wi-Fi or Ethernet.
Personnel
If your business or team is new to 3D printing, then you should consider the impact of two key considerations:
- Being able to design parts suitable to be 3D printed
- Operation of the printers
With Ultimaker you can easily create prints from industry-standard file types, including STL, OBJ, X3D, and 3MF. But if you need parts with specific high-performance mechanical properties, are struggling to get the results you need from your prints or want to design for
optimized print times, it is a good idea to learn more about design for additive manufacturing (DfAM). A good starting point is our free ‘How to design for FFF 3D printing’ guide, which contains useful tips on understanding 3D printing technology and CAD. For a more in-depth experience, check with your reseller to see if they offer training courses.
Operating Ultimaker 3D printers is deliberately made as simple as possible, and in most cases you will not need a new team member or any training to manage this. If you have more than around 10 printers, you may find you need to consider having a dedicated operator. Whatever you choose, it is important that responsibility is made clear for tasks such as routine maintenance and monitoring and ordering material supplies. This will minimize downtime and help you get the most from your printers.
Once you have your team and workspace ready for 3D printing, it’s time to put in place a workflow that enables you to produce what you need, when you need it.
3. WORKFLOW
Establishing an efficient workflow will make a huge difference to how quickly you achieve a return on the investment in 3D printing and the quality of your 3D printed parts.
To help get you started, we analyzed and defined the typical 3D printing workflow.
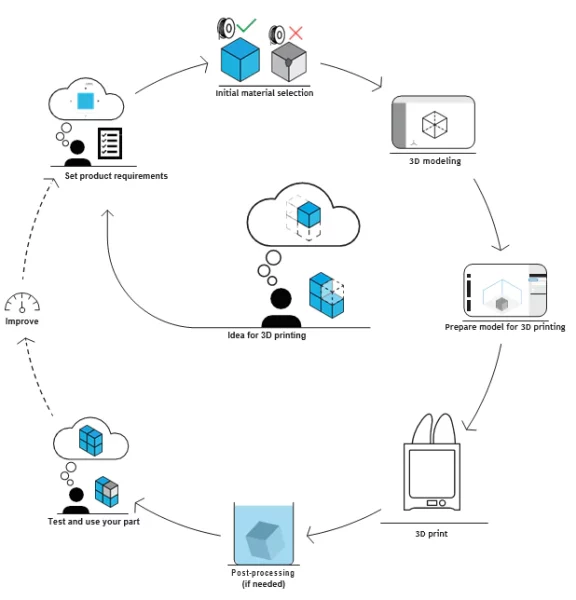
Material selection
Post-processing (if needed)
Once you have an idea for a 3D printed part, the first step is to choose a material you will use to create it.
With an Ultimaker printer, you can choose from a range of 11 Ultimaker materials or any third-party material you want to use. Many material manufacturers also provide printing profiles for their filaments for use with Ultimaker printers to ensure optimal results
(we cover how to use these in the software section later).
With so much choice, here are a few of the materials you may want to consider for your applications:
- Tough PLA gives good impact resistance with the affordability, speed, and easy-printing of a PLA filament – a great choice for robust, just-in-time tooling
- Nylon can be used to create strong parts that also offer abrasion resistance and low friction, perfect for quality assurance gauges that need to be used time and again
- TPU 95A is a semi-flexible, rubber-like material which can be used to add protective surfaces to tools to avoid any possible damage from contact with products
3D modeling
When designing for 3D printing, we highlight seven key considerations for the geometry and features of your part. As this is a big topic, we will summarize these below, but for a much more detailed tutorial, we recommend also reading our ‘How to design for FFF 3D printing’ guide.
- Nozzle size. Remember to consider the diameter of the nozzle you print with. The minimum wall thickness of your part should be the same or bigger than the diameter of your
- Bottom layer. The bottom layer is the foundation of your 3D The larger the bottom layer surface, the better the adhesion to the printer build plate. Use chamfers instead of fillets for edges that are in contact with the build plate. And because of the printer’s round nozzle, it is worth noting that rounded corners are more effective than sharp corners.
- Support material. A dual extrusion printer such as the Ultimaker 3 or Ultimaker S5 can print specialist support material to ‘support’ overhangs or cavities and enable more complex However, you may still want to avoid this in order to save time and extra material costs. A good way to do this is to ensure your part does not contain any overhangs with a below 45-degree angle from the build plate.
- Small details. If your design features small details, we recommend printing it with a smaller nozzle diameter and making sure small details have enough time to cool before the next layer is
- Tolerances. Plastic polymers shrink when they are heated and then cooled, so you need to take this into account when designing parts that need specific tolerances. With some materials (such as PLA), this is usually not noticeable. But for more advanced filaments, you could perform printing tests with the material to determine how much you need to compensate for in your
- Fast printing. If fast production is required, you can reduce the thickness of the bottom or the walls of your print, or choose a larger nozzle
- Modularity. Like all additive manufacturing technologies, an FFF 3D printer is limited by its build But that does not mean it is not suitable for producing very large objects. Instead, use a modular design made up of multiple components which can be produced more quickly if you have multiple 3D printers.
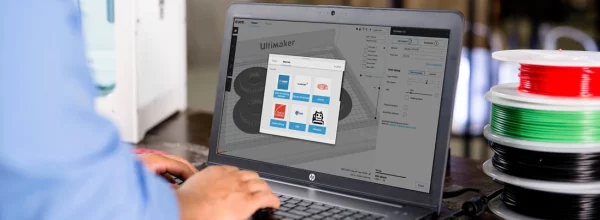
Preparing your 3D model for printing
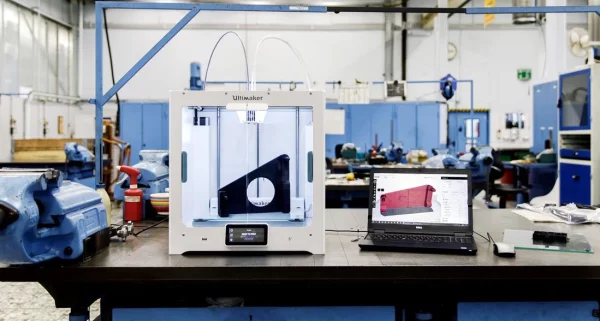
Once you have a 3D design file, you can load it into print preparation software that will turn it into printing instructions for your printer.
Ultimaker Cura is the most widely used 3D printing software in the world, with over 2 million users. It is free to download from our website.
With its straightforward Recommended mode, you can load your model and choose key settings (layer height and infill density) to start printing in no time. With preconfigured material profiles and by reading the configuration from your network-enabled printer, it really is this easy.
But if you want, you can also switch to Custom mode and tweak hundreds of settings to get highly customized results.
Printer operation
When you have prepared your print in Ultimaker Cura, you can save it to USB or SD card, or for a more efficient printing experience, send it print over network.
As well as not having to walk over to the machine to start a print, a network-enabled printer offers extra benefits for managing the 3D printing process.
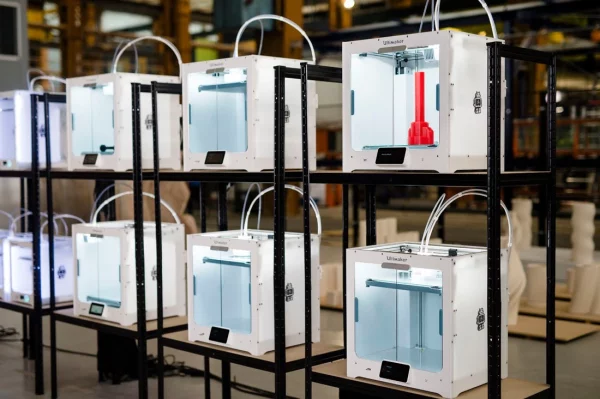
Our Cura Connect print management tool runs on your printer (if network enabled) and enables you to queue multiple print jobs, monitor print progress, keep track of maintenance, and track printing analytics – all from your desktop.
This can be particularly effective if you have multiple 3D printers. You can create groups of printers, such as for a particular configuration you use frequently, or for use by different teams. Your queued print jobs will automatically start when a printer with the right configuration becomes available.
Post-processing
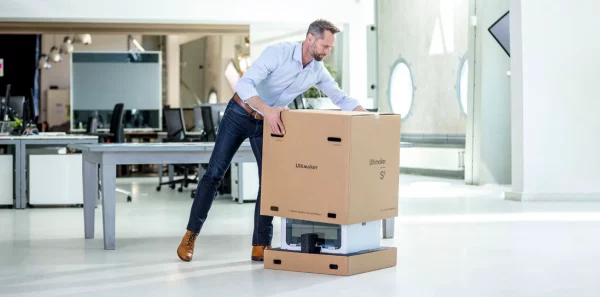
When your print finishes, wait for the build plate to cool, then remove the part. If it seems to stick, use a spatula to free it from the build plate.
Often, the only post-processing you will need to do is remove the thin brim around your print that is added for optimal adhesion. This can be done by hand or with a small modeling or hobby knife.
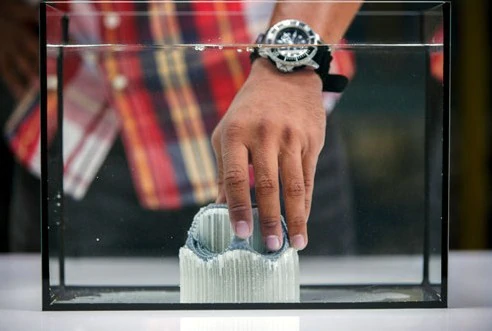
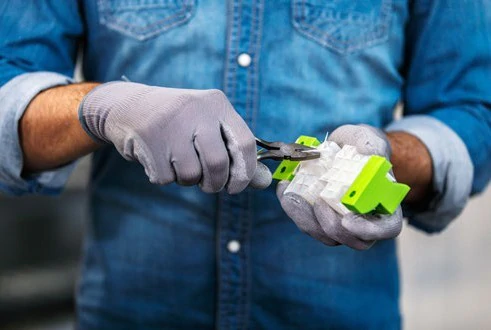
If you printed with soluble support material, such as Ultimaker PVA, you will need to dissolve these supports before you can use your print. Or if you used manually detachable supports, now is the time to remove these. Ultimaker Breakaway material can be removed with a pair of pliers.
Once supports are removed, you can start with any further post-processing needed for the application of your print. Additional post-processing options include:
- Sanding your print for a smooth surface finish
- Polishing with a plastic polish compound
- Glueing modular parts together using a modeling or industrial adhesive
- Painting your print, using a bottom layer of primer and a separate top coat
- Screw threading
Note that not all post-processing techniques are suitable for all materials, so be sure to research and test your chosen method before trying it on your final part. Follow the manufacturer’s guidelines for any off-the-shelf products you use in post-processing
4. APPLICATION IDEAS
3D printing gives manufacturers a powerful competitive edge – avoiding costly outsourcing and speeding up development cycles for jigs and fixtures. With Ultimaker 3D printers
on hand to meet demand, you can ensure quicker machine setups, less variation during assembly and fitting, secure part holding, and a smoother production process.
But how do you put this into practice and make sure you are maximizing your return on investment? This list of application ideas will help you make the most of your 3D printer.
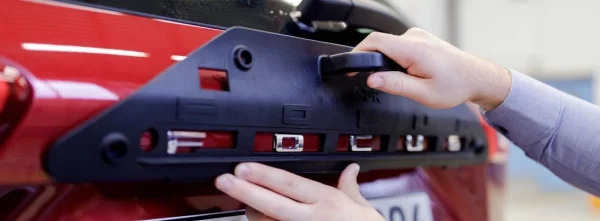
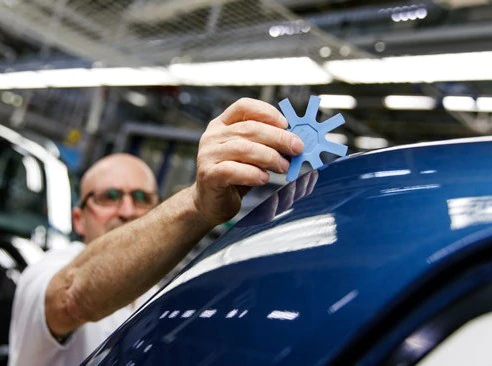
Jigs and fixtures
Ensure an efficient production process with strong, affordable tools, on demand. A 3D printer is ideal for keeping a just-in-time inventory, and means you can turn feedback from operators into a new iteration in a matter of hours.
Tip: Create even more effective tooling with modular design and 3D printing. Need to avoid scratching from the tool? Add a layer of semi-flexible TPU 95A material to one surface. Does one part of the tool wear down? Design it as a replaceable segment.
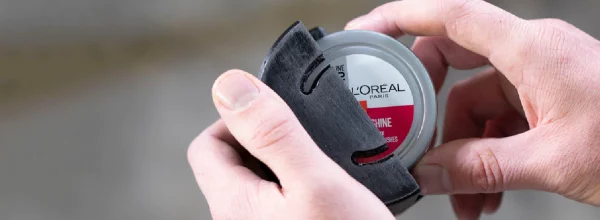
Quality assurance
Test the quality and accuracy of manufactured parts with precise gauges for the production line. And you can ensure consistency across multiple facilities by easily sharing 3D models with colleagues.
Tip: PLA is a great go-to material for creating precise gauges due to its excellent dimensional accuracy.
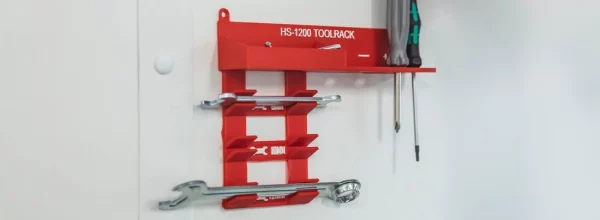
Tool organizers
Be lean and efficient with 3D printed organizers for production stations. Enable manufacturing best practices such as ‘poka-yoke’ and Six Sigma with easily customizable working spaces.
Tip: Network multiple Ultimaker printers with Cura Connect to quickly and efficiently deliver a new batch of organizers for the entire line, so you can evolve and stay lean without delaying production.
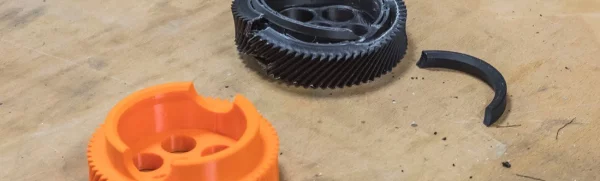
Replacement parts
If a custom-made or obsolete part fails and puts your production line out of action, waiting days or weeks for a new version is not an option. With a 3D printer you can quickly get a temporary or even permanent replacement part and keep the plant running.
Tip: 3D models for printing can also be created from a 3D scan. So if a custom part breaks, you don’t even need CAD to create a new one. HP scanning tools even integrate with Ultimaker Cura for a simplified scan-to-print workflow.
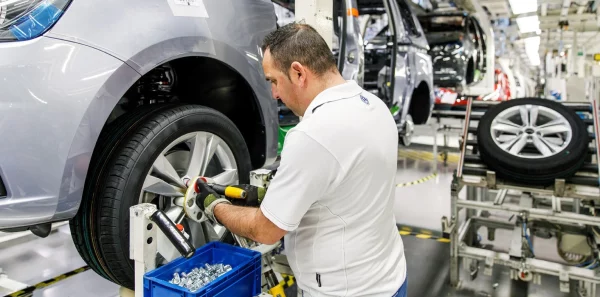
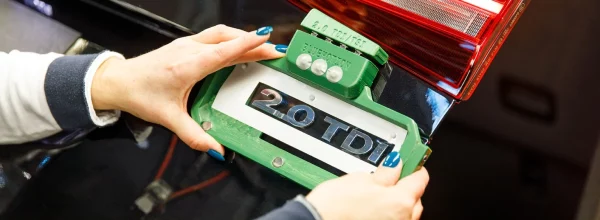
Case study: Volkswagen Autoeuropa
By using 3D printed tools, jigs, and fixtures, Volkswagen Autoeuropa reduces cycle time operation, labor, and the need for reworking, while improving tool ergonomics. Furthermore, they achieve this at a tenth of the usual cost, saving an estimated $375,000 per year.
“The timings and costs to produce tools led us to a fast ROI, better product quality, and satisfaction throughout the entire process – from development stages to the final product. Our innovative 3D printed products are being used in several areas and are considered best practices within the Volkswagen Group.”
Luís Páscoa, Pilot Plant Manager at Volkswagen Autoeuropa
Before, Volkswagen Autoeuropa used third-party suppliers to manufacture their custom tools and prototypes. The process took several weeks, especially when multiple designs or assemblies were required. It also meant more paperwork, quotations, and the adoption of a trial-and-error approach, all of which were holding up the tool manufacturing process
- at additional
With several Ultimaker 3D printers, 93% of manufactured tools previously made externally now created in-house. Within two years, their assembly-tooling cost savings increased
- from 70% to 95%. Ultimaker enables Volkswagen Autoeuropa to test solutions without having to contact suppliers, reducing the time taken by an average of eight Below is the cost breakdown of moving 3D printing for the production line tool for positioning of a vehicle 2.0 TDI emblem.
Posted in Applications