
Setting “Fuzzy Skin” on Cura software
The new version of the Cura printing software presents new exciting features. The Dutch 3D printer specialist Ultimaker is distributing this new version and promises you additional exciting features.
The cool “Fuzzy Skin” feature is part of these reworked as well as elaborated features and promises you a whole new dimension in modeling your 3D prints. As the name already tells you, this setting creates a certain surface structure.
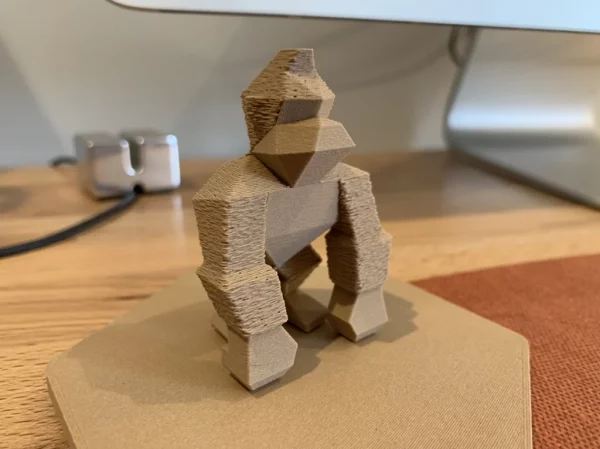
Cura Fuzzy Skin Donkey Kong (source: reddit.com)
The setting processes the surface to make it look similar to microfibre. This means that the printer travels the outer lines in a jerky way. This makes the structure of the surface rough.
In addition, this means that the so-called Fuzzy Skin is only applied on the outside. This prevents this surface structure from appearing inside objects. As a result, the parts can be placed more easily into each other. This setting works on all levels, i.e. horizontally as well as diagonally.
For Which Objects is “Fuzzy Skin” Suitable?
So what can you use this new feature for? Due to the fact that it roughens the surface structure of an object, the regular visible lines become invisible. So this particular tool is great for parts that you want to give a unique surface appearance.
This includes figures whose skin surface or fur you want to highlight. With Fuzzy Skin the cover gets a look that makes the whole piece look much more plastic.
Accordingly, you can use this setting whenever you want to emphasize the structure of your workpiece. Specifically the representation of fur in animal depictions makes Fuzzy Skin work well.
For the new extended function, which means that Fuzzy Skin only appears on the outside of the print object, there are other uses you can try out.
As this extension means that the surface is only roughened on the outside, this technique is particularly suitable for printing handles or similar objects. This is due to the fact that the parts can be very well placed on other objects.
Basically, there are no limits to your imagination. Surely you have many ideas of your own what you want to create with this special attitude. The advantage of 3D printing is that you can easily turn your ideas into a physical object.
Where can I find the “Fuzzy Skin” Setting?
In your Cura Modeling software you will find a large number of different and unique settings. Therefore it can happen that you may not find the Fuzzy Skin setting at first sight. Don’t worry, here you will find out exactly where to look.
At the very bottom of the settings bar in the opened software you will find the tab “Experimental”. Below it, you will find several modeling tools that you can use with one mouse click. Among these tools, you will quickly find the setting “Fuzzy Skin”.
If you cannot find it immediately, you can also use the search function:
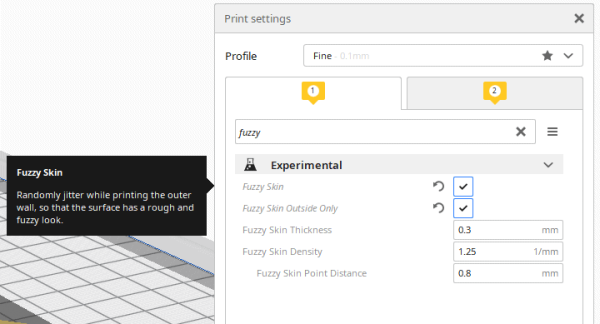
As soon as you click on the box next to it, your print will be created for you in this style. This setting also allows you to configure the characteristic values yourself. This means that you can set the thickness and density of the fuzzy skin. Another additional setting of the tool is the distance to the main point.
All in all, the setting is very easy for you. You have many possibilities to customize the tool to your individual needs. In the end, you decide what you want to create.
Conclusion – 3D Printing and the Fuzzy Skin Feature
With 3D printing, you can immerse yourself in a dynamic and innovative world that offers many surprising and fascinating tools. Predicting the future is indeed very difficult in terms of market changes and new developments in this field.
However, it can be said with certainty that this technology will continue to expand both in industrial production and private use. Ultimately, 3D printing offers a wide range of uses to support research and development.
It is highly probable that many of the possibilities offered by this technology have not yet been developed. It takes creative and analytical minds like you to generate the far-reaching potential and opportunities for the future.
The “Fuzzy Skin” setting certainly makes a decisive contribution to these forecasts.
This tool makes it possible to adapt and refine the surface structure. Many production sites and private households can benefit from this function. On the one hand for the outstanding suitability for the production of handles. But also for the novel design possibilities.
The application of the software Cura is basically easy to understand and therefore also suitable for a beginner. In this modeling software, you are free to act out and create things you have always dreamed of. No matter if you need a 3D printer for your private pleasure or for business.
You will definitely benefit from this technique and discover the beautiful variations and designs for yourself. With “Fuzzy Skin” you will experience a special and yet almost inconspicuous design suggestion, which will give your valuable piece that certain special nuance. A beautiful feature that not only industrial production will discover for itself.
Vase mode is a feature in Cura for “aesthetic prints”. Follow along as we demystify Cura’s vase mode to create some seamless models.
Is It Just for Vases?
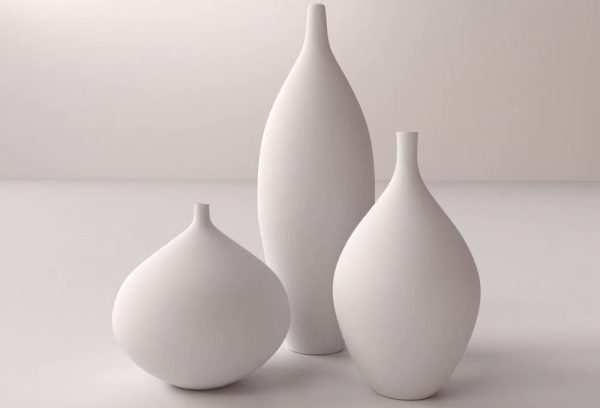
(Source: ) A collection of modern vases (rendered) (Source: firdz3d via CG Trader)
Among many slicer options available today, Ultimaker Cura remains a common choice for many. Besides being free and relatively easy to use, it boasts several handy features. One of those handy features is vase mode, also known as “Spiralise Outer Contour” in Cura.
This mode enables you to print objects relatively quickly while also using less material. Using this feature, you can print almost any model with the thickness of just a single wall. This mode is suited for models that have a continuous cross-section, without any holes or gaps in their geometry; hence the name Vase Mode.
Let’s explore this fantastic feature to see how you can make use of it!
The Setting: Simply Explained
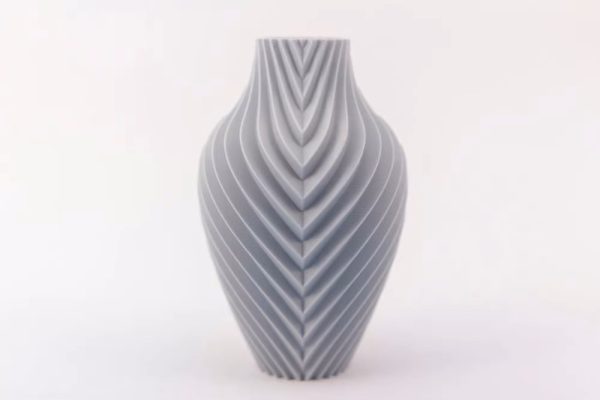
A monochromatic vase printed using vase mode (Source: www.devinmontes.com)
In Cura, vase mode is known as “Spiralise Outer Contour”, and there’s a reason for this: in Cura’s Vase Mode, the print progresses upwards in a spiral, thus there aren’t any real layers. Instead, the model is gradually building up through smooth, continuous movements of the Z-axis.
The movement of the printer components during this process makes for a very engaging visual experience, so it’s widely used for demonstrating the abilities of 3D printing.
How Does It Work?
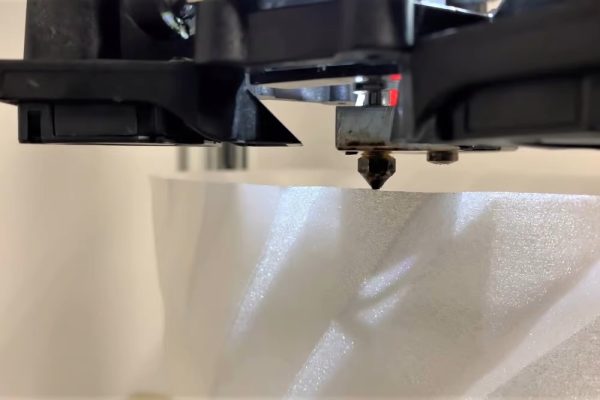
From start to finish, the nozzle doesn’t travel, retract, or stop extruding (Source: 3D Printing Nerd via YouTube)
In Cura, this setting is available under the “Special Modes” tab. Just check the box to enable it. Once activated, make sure you load a model that has a continuous geometry, similar to a vase or a cylinder. When you hit the slice button, Cura will slice the object to have just a single wall, a solid bottom, and no top surfaces.
Note that in vase mode, you can only load a single model at a time because the nozzle traces a single continuous path. This means retraction doesn’t occur: The object is made of a long, unbroken string of filament laid on top of itself, turn after turn.
Settings to Tweak
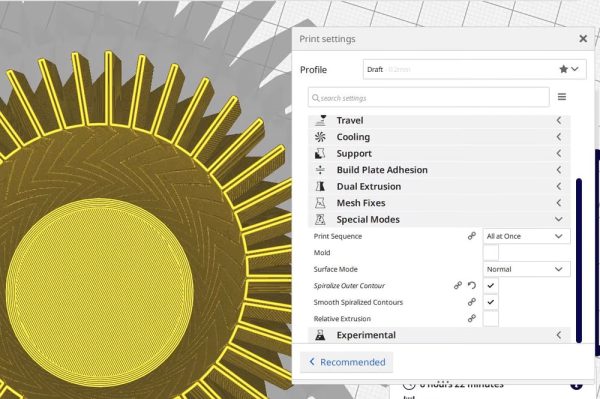
To enable Vase Mode, tick the “Spiralize outer contour” box (Source: All3DP)
Now that you know how vase mode works, you should understand the settings you need to get right to achieve the best results.
- Wall Line Width: The width of a single wall is pre-set in the slicer and corresponds to the nozzle size that you’re using. For a 0.4-mm nozzle, the width of a single line is 0.4 mm. A higher line width will create a much stronger print, and a nozzle of greater size will provide you with a higher line width. But swapping out the nozzle isn’t the only way: A 0.4-mm nozzle can also give you a wall thickness of up to 0.6 mm if you get the following two settings right.
- Temperature: Vase mode or not, getting your temperature settings dialed in will go a long way. A larger nozzle size will be pushing out much more material, so a 0.6-mm nozzle will need a slightly higher temperature than your 0.4-mm nozzle. And it’s the same story when you’re printing with a higher line width. Try increasing the temperature in steps of five degrees at a time.
- Speed: Vase mode needs to be slow. Each layer requires a sufficient amount of cooling time. Plus, if the line width is higher, you need to go slower still. A 25–30-mm/s wall printing speed is a good starting point.
These are the settings that you can use if you’re getting started. You should experiment with your own machine and material to find the sweet spot. Just remember that each parameter corresponds to the other, so if you change one setting, the others need to be changed, too.